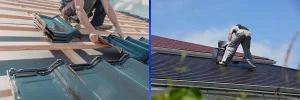
We get asked this question almost every day.
Someone walks into our Truganina store or calls the team, they’ve got a pergola frame up or a patio that needs a roof, and they want to know: “What should I actually put on it?”
Most online guides give you the spec-sheet answer. We’re going to give you the real one — the version that comes from years of watching Melbourne homeowners and tradies buy these products, install them, and occasionally call us back to talk about what went wrong.
Here’s what we’ve learned.
First, Why This Decision Actually Matters
Melbourne’s weather is genuinely hard on roofing materials. It’s not just the heat, it’s the combination. You can get a 38°C day in November, then a severe hailstorm two days later, then three weeks of UV-heavy summer sun. Materials that work fine in milder climates can crack, yellow, or buckle here within just a few seasons.
We’ve seen it. Homeowners who went with the cheapest clear sheets they could find, came back two summers later with panels that looked like frosted bathroom glass. Or worse, cracked clean through after a hail event.
So when we say the material choice matters, we mean it from experience, not from a brochure.
Option 1: Glass — Honest Thoughts from Our End of the Counter
Glass is beautiful. There’s no argument there. When a customer comes in asking about it, we understand the appeal completely.
But here’s what we always say: for a standard residential pergola or patio in Melbourne, glass rarely makes practical sense.
The issues aren’t just about cost — though structural glass will run you significantly more than polycarbonate or fibreglass in both materials and installation. The bigger problems are weight, heat, and hail.
Standard glass without a specialised coating turns your outdoor space into an oven in summer. We’ve heard from customers who had glass panels installed on south-facing structures and were still complaining about heat buildup. The infrared heat comes straight through.
And hail? Even toughened glass has its limits. Melbourne hailstorms can throw hailstones well over 25mm. We’ve seen damage reports from suburbs that aren’t even that far from us — Point Cook, Hoppers Crossing, Werribee. Glass doesn’t forgive that kind of impact.
There’s also the installation reality. Glass needs a licensed glazier and engineer-certified structural support. It’s not a weekend project.
Our honest take: If budget is no object, you’re working on an architectural feature, and you’ve got a pro glazier handling it — go for it. For everything else, keep reading.
Option 2: Polycarbonate — What We’d Put on Our Own Pergola
If one of us here at Singh Roofing was building a pergola in our own backyard this weekend, this is what we’d be loading into the ute.
Polycarbonate has earned its place as the go-to transparent roofing material in Australia because it genuinely delivers where it counts — UV blocking, hail resistance, weight, and DIY practicality. We sell a lot of it, and the customers who come back are almost always happy with it.
Corrugated Polycarbonate — The Everyday Workhorse
This is the one we recommend most often for residential pergolas and patios. It’s lightweight, it matches standard corrugated Colorbond profiles so it sits right on existing frames, and it’s genuinely manageable for a confident DIYer.
The sheet we sell most is the Laserlite 2000. It comes in corrugated, greca, and trimdeck profiles, blocks 99.9% of UV radiation, and is backed by a 10-year warranty against hail up to 25mm. That warranty isn’t marketing — it’s why we stock it ahead of cheaper alternatives.
🛒 Laserlite 2000 Corrugated Polycarbonate Clear, Bronze, Grey Tint, Cream & Opal | Lengths 1.8m–7.2m From $23.94/sheet → Shop Now
The question we get a lot is: “Is it worth upgrading to Laserlite 3000?”
Honestly, yes — if your pergola faces west or north, or if you actually want to sit under it in summer rather than just look at it from inside. The Laserlite 3000’s Comfort Cool™ technology reflects infrared heat rather than letting it through. In a Melbourne summer, that difference is real and noticeable.
🛒 Laserlite 3000 Corrugated Polycarbonate Platinum, Frost, Gunmetal + standard colours | Up to 50% better heat reduction From $28.80/sheet → Shop Now
If you want something a bit different from standard corrugated, the Suntuf BH (Beehive) is worth a look. It’s a textured corrugated profile — more contemporary looking, still easy to install.
🛒 Suntuf BH (Beehive) Polycarbonate → View Product
Multiwall Polycarbonate — For Enclosed or Year-Round Spaces
If you’re enclosing the pergola rather than leaving it open, flat multiwall sheets are a smarter choice. The twin-wall or multi-wall construction acts like double glazing — better thermal insulation, softer diffused light, and noticeably quieter in rain.
A bit more involved to install correctly (end-sealing and H-bars are not optional — more on that in the accessories section), but the result is a proper weatherproof outdoor room.
🛒 Sunlite® Multiwall Polycarbonate → View Product 🛒 Sunpal® Multiwall Polycarbonate → View Product
Option 3: Fibreglass — Still Useful, But Know What You’re Getting
Fibreglass has been on Australian homes since the 1970s. Some of it is still out there and still doing its job — which tells you something about its durability.
But here’s the thing: most people buying fibreglass today are doing a like-for-like replacement, not a new installation. And that makes complete sense. If your existing pergola has fibreglass sheets, matching the profile is often easier and cheaper than converting the whole frame.
For new builds, though, we’d steer you towards polycarbonate almost every time. Here’s why:
- Fibreglass yellows. It’s not a question of if, it’s when. UV breaks down the resin binder over time, and what starts as a clear or lightly tinted sheet gradually goes the colour of an old plastic bottle. Quality varies between products, but it’s a consistent characteristic of the material.
- Fibreglass doesn’t handle heavy hail as well. It can crack where polycarbonate would flex and survive.
- Cutting fibreglass kicks up airborne particles. Not dangerous if you wear the right PPE — gloves, P2 dust mask, eye protection — but more unpleasant to work with than polycarbonate.
We stock fibreglass because there are projects where it’s clearly the right call. But we’ll always have an honest conversation about it first.
🛒 Fibreglass Roofing Sheets → View Range
The Light Transmission Question — What the Numbers Actually Mean Day-to-Day
Every polycarbonate product has a light transmission percentage on the spec sheet. Here’s how to translate that into real life:
| Transmission | What It Feels Like Underneath |
| 90%+ | Very bright — almost like open sky. Great for north-facing areas but can feel harsh mid-afternoon in summer. |
| 75–90% | Comfortable, natural daylight. This is where most Melbourne pergolas land and it’s a good place to be. |
| 50–75% | Noticeably softer light. Smart for west-facing roofs that cop the late afternoon sun hard. |
| Below 50% | Dim. Think shade structure rather than transparent roof. |
One thing we see people overlook: colour affects more than looks. Bronze tint cuts glare beautifully on west-facing roofs. Grey tint is good for areas that face north all day. Clear lets in the most light but also the most heat if you don’t upgrade to a heat-reflective product.
If you’re not sure what colour suits your specific situation, call us — this is genuinely the kind of question we enjoy helping with.
Melbourne’s UV Index regularly reaches 11–13 in summer, which puts it among the highest of any major city in the world (ARPANSA, arpansa.gov.au). A sheet that blocks UV is not just about comfort — it’s a genuine health consideration for anyone spending time outdoors.
Worth Reading: Blocking the Burn: How Laserlite Roofing Protects Your Family from UV Rays on Melbourne’s Coastal Decks & Patios
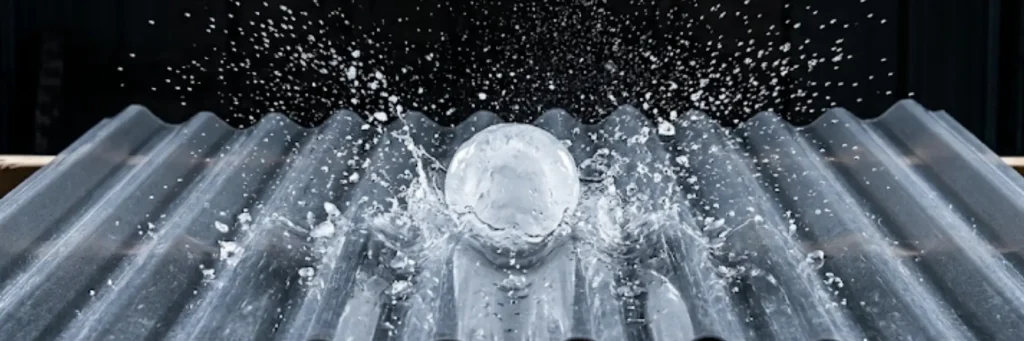
Hail — The Melbourne Factor That Changes Everything
We need to talk about this because we see the aftermath up close.
Melbourne gets serious hailstorms. Not just light pea-sized stuff — we’re talking golf-ball hailstones that have smashed through substandard roofing across the western suburbs in recent seasons. Wyndham, Melton, Brimbank — if your postcode is in Melbourne’s west, hail is not a hypothetical risk.
Glass: Highest breakage risk. Toughened glass takes light impacts fine, but large hailstones can shatter even toughened panels.
Fibreglass: Handles moderate hail okay. Larger hailstones can crack it, especially sheets that have weathered and become more brittle over time.
Polycarbonate: The clear winner. Polycarbonate is genuinely impact-resistant in a way the other two materials aren’t. Laserlite 2000 and 3000 are specifically tested and warranted against hailstones up to 25mm for 10 years. That’s not a throwaway line — it’s real product engineering for Australian conditions.
🛒 Laserlite 2000 — 10-Year Hail Impact Warranty → Shop Now
DIY Installation Guide — With the Tips We Actually Give Customers
Right. You’ve chosen polycarbonate. You’ve got your sheets. Here’s how to install corrugated polycarbonate properly — including the mistakes we see people make, and how to avoid them.
Everything You’ll Need — From Our Shelves to Yours
Roofing Sheets:
- Laserlite 2000 Corrugated — From $23.94/sheet
- Laserlite 3000 Corrugated (heat-reducing) — From $28.80/sheet
- Suntuf BH Beehive Profile
Fixings — get the right one for your purlin type:
- Tri-Fixx One Shot Timer Screws 50mm + Polycarb Washer — From $29.95 (timber purlins)
- POLYCUT® Polycarbonate Fixing Screws — 50 Pack — $32.00 (steel/metal purlins)
- One Shot Timber Screws Laserlite 50mm — 50 Pack — $32.00
Accessories — don’t skip these:
- Eave Infill Strips White Corrugated — 4 Pack — $12.00
- Eave Infill Strips Black Corrugated — 4 Pack — $12.00
- Noise Stop Tape White — 20m Roll — $23.50
- Full Polycarbonate Accessories Range
Tools:
- Circular saw or jigsaw (fine-tooth blade, 60+ TPI)
- Cordless drill
- Tape measure and chalk line
- Safety glasses, gloves, work boots
- A ladder rated for the work height
Step 1 — Measure Properly and Order Extra
Measure your full roof opening — width and length. Allow at least one corrugation of side overlap between sheets, and a minimum 200mm end lap where sheet ends meet.
Here’s something we see constantly: people measure their pergola, order the exact number of sheets, then call us on install day because one sheet snapped during cutting. Always order one extra. The cost of a spare sheet is nothing compared to stopping a job mid-way.
Step 2 — Check Your Purlin Spacing Before You Order Anything
Purlins should be spaced no more than 900mm apart for corrugated polycarbonate at standard roof pitches. Steeper pitches can tolerate wider spacing — check the Laserlite install guide for specifics.
If your frame is already built to standard corrugated Colorbond spacing, you’re almost certainly fine. But check before you commit to your sheet selection — profile choice can affect the maximum purlin spacing.
Step 3 — Fit Eave Infill Strips First
Before a single sheet goes on, run your eave infill strips along the bottom purlin (eave) and ridge purlin (top). These foam strips follow the corrugated profile exactly and seal the gaps where insects, birds, and water would otherwise get in.
This is the step we see DIYers skip most often, and it’s the one they regret most. Filling a veranda with mosquitoes because the eave was left open is a very fixable problem that’s much harder to fix after the sheets are on.
🛒 Eave Infill Strips White Corrugated — $12.00 🛒 Eave Infill Strips Black Corrugated — $12.00
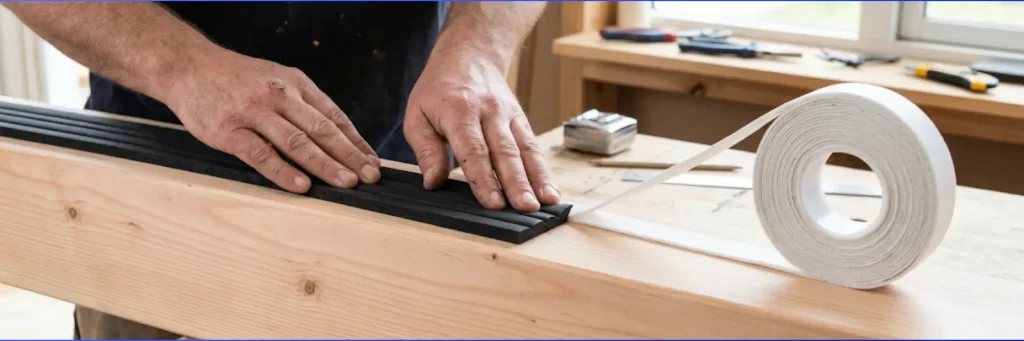
Step 4 — Lay Noise Stop Tape Along Every Purlin
Run a strip of Noise Stop Tape along the top face of each purlin before you lay the sheets. It compresses slightly when the sheets are screwed down and creates a cushioned seal.
Why does this matter? Rain on polycarbonate is loud. Like, genuinely loud. Without this tape, a heavy Melbourne downpour on your new pergola roof can sound like someone dropping a bag of marbles directly above your head. With the tape, it’s noticeably quieter. Ten minutes of work, big difference in liveability.
🛒 Noise Stop Tape White — 20m Roll — $23.50
Step 5 — Cut Sheets With the Protective Film On
If your sheets need trimming, cut them with the protective film still on. The film is there to protect the surface during handling and installation — it also makes marking easier and keeps the cut clean.
Use a circular saw or jigsaw with a fine-tooth blade. Cut from the underside where possible for the cleanest edge. The sheet cuts easily — don’t force it.
Don’t forget: polycarbonate offcuts are lightweight but have sharp edges. Keep the gloves on.
Step 6 — Start From the Right Side and Fix Down Properly
Start laying sheets from the side of the roof that faces away from the prevailing wind. In Melbourne, that typically means starting from the east side and working west.
The three fixing mistakes we see most:
Mistake 1 — Fixing into the valley instead of the crown. Always screw through the top (crown) of the corrugation. Fixing into the valley means water sits around the screw head and can work its way in over time.
Mistake 2 — Using the wrong screw for the purlin material. Timber purlins need Tri-Fixx Timer Screws. Steel purlins need POLYCUT® Screws. Using the wrong thread type on the wrong material means the fixing doesn’t bite properly.
Mistake 3 — Overtightening. This is the big one. The polycarb washer on each screw should compress slightly — firm, but not crushed flat. When you overtighten, you put stress on the sheet around the fixing point, and that’s where cracks start. Snug is right. Tight is too tight.
🛒 Tri-Fixx One Shot Timer Screws 50mm + Washer — From $29.95 🛒 POLYCUT® Polycarbonate Fixing Screws — $32.00 / 50 pack
Step 7 — Overlap Each Sheet Correctly
Side overlap: one full corrugation minimum. End lap (where sheet ends meet): 200mm minimum, always over a purlin. If your end lap isn’t sitting over a purlin, adjust your purlin spacing before you get this far — not after.
Step 8 — Peel the Film Off Straight Away
Once all sheets are fixed, remove the protective film immediately. Don’t leave it on until the weekend is over or “until you’ve cleaned up.” Melbourne’s summer sun can bond protective film to the polycarbonate surface within 24–48 hours of UV exposure, making it very difficult to remove cleanly without scratching the sheet.
Peel from the downslope edge and work your way up. It comes off easily when it’s fresh. It becomes a real problem when it’s been sitting in sun for a week.
Step 9 — Finish With Ridge Flashing
Cap the top edge with metal ridge flashing to seal the roofline and prevent water ingress at the high point. A clean ridge finish also makes the whole installation look more professional.
Installing Multiwall Polycarbonate? You Need These Too
Flat and multiwall sheets need a different set of accessories to be installed properly. Don’t skip these — end-sealing multiwall panels correctly is what separates a job that lasts from one that fills with condensation and mould within two seasons.
🛒 Laserlite Multiwall H Bar Aluminium 2-Piece 6.0m — From $94.29 (joins sheets side-by-side) 🛒 Laserlite Multiwall Aluminium Edge Bar 6m — From $94.29 (finishes exposed sheet edges) 🛒 Laserlite Multiwall Gasket End Cap 10mm x 10m — $37.00 (seals sheet ends — non-negotiable)
The Quick Verdict Table
| Glass | Polycarbonate | Fibreglass | |
| Cost | $$$ | $$ | $$ |
| UV Protection | Medium | Excellent — 99.9% blocked (Laserlite) | Basic |
| Hail Resistance | Poor–Moderate | Excellent — 10yr warranty up to 25mm | Moderate |
| Weight | Heavy | Lightweight | Medium |
| DIY Install | ✗ — needs a glazier | ✓ — very manageable | ✓ — with PPE |
| Longevity in Aus. conditions | 20+ yrs | 15–25 yrs | 10–15 yrs |
| Yellowing over time | No | No | Yes |
| Best for | Premium architectural | Residential pergolas & patios | Like-for-like replacement only |
Come and See Us, or Order Online
Everything in this guide is stocked at our Truganina warehouse and available online with Australia-wide shipping. If you want to talk through your specific project before ordering — sheet lengths, colour choice, purlin spacing, profile options — give us a call or come in. This is what we do every day, and we’re happy to help you get it right the first time.
Frequently Asked Questions (FAQs)
1. What’s the difference between polycarbonate and fibreglass roofing?
Polycarbonate is a tough plastic with built-in UV protection and genuine impact resistance. Fibreglass is glass-reinforced resin — it works, but it yellows over time and doesn’t handle heavy hail as well. For new installations, polycarbonate is the better long-term investment almost every time.
2. Is polycarbonate roofing okay for Melbourne’s hail storms?
Yes — specifically Laserlite grades, which are warranted against hailstones up to 25mm for 10 years. That’s a real warranty based on real testing for Australian conditions, not a marketing claim.
3. Can I genuinely install polycarbonate roofing myself?
Yes, if you’re comfortable with a drill and a saw. Corrugated polycarbonate is the most DIY-friendly transparent roofing product available. Follow the steps above, use the right fixings for your purlin material, and don’t overtighten. The job is very achievable over a weekend.
4. What colour polycarbonate should I choose?
It depends on which way your roof faces and how you want to use the space. Clear gives maximum light. Bronze or grey tint reduces glare significantly — great for north or west-facing pergolas. If you want to use the space in summer without sweltering, step up to Laserlite 3000 in any colour. Call us if you’re unsure — this is a question we answer every single day.