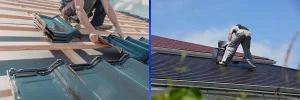
If you’re working with T1-11 siding, you’ll know how important it is to keep moisture out. This textured plywood or OSB siding is durable, affordable, and perfect for sheds, garages, and rustic homes across Australia. But like any siding, it has one sneaky enemy – water infiltration. That’s where Z flashing comes in.
Having Z flashing installed correctly will keep rainwater out of horizontal joints, so you don’t end up with rot, swelling, and the dreaded headaches down the road. Now let’s make installing Z flashing on T1-11 siding a mystery no more, so your cladding stays strong for many decades to come.
What is Z Flashing?
Z flashing is a metal flashing in the form of the letter ‘Z’ when looked side-wise. It is placed between horizontal siding panels. The top section goes behind the top panel, the middle portion sticks out a little, and the bottom goes over the bottom panel. This configuration turns water away from joints to avoid seepage behind your siding.
You’ll typically see Z flashing used in:
- T1-11 siding installations
- Window or door trim connections
- Any horizontal siding break
Using Z flashing is essential for any T1-11 siding installation involving panel breaks or horizontal trims to comply with building codes and ensure long-term durability.
Materials You’ll Need
Before starting, gather your tools and materials:
- T1-11 siding panels
- Z flashing (galvanised or aluminium, depending on your siding type)
- Measuring tape
- Tin snips or a metal cutting tool
- Pencil or chalk
- Circular saw or table saw
- Galvanised nails or exterior-grade screws
- Hammer or drill
- Caulking (exterior-grade sealant)
Always wear gloves and safety glasses when cutting metal flashing.
Step-by-Step Installation Guide for Z Flashing on T1-11 Siding
Here is an easy step-by-step process that you can use:
1. Measure and Cut the Z Flashing
Measure the width of your siding where you want flashing installed. Cut the Z flashing to size with tin snips, having a tight fit with small gaps at the ends. If the length of your panel run is wider than your flashing, overlap adjacent pieces by about 25mm so that water cannot enter.
2. Install the Bottom Panel First
Start by putting your lower siding panel to the break point horizontally, where Z flashing will be required. Keep it level and securely held in place. T1-11 siding typically has panels installed grooved vertically with the edges over studs or framing for support.
3. Put the Z Flashing
Position the Z flashing over the bottom panel. The bottom leg of the flashing goes over the top of the lower siding, with the vertical section lying flush against the wall, and the top leg facing upwards. The top leg will slide behind the upper siding panel.
Ensure that the flashing overshoots the lower panel by about an inch to effectively direct water away. Secure it in position with galvanised nails or screws up the top of the vertical piece. Don’t overdrive fasteners, which can warp the flashing and provide places for water intrusion.
4. Seal if Necessary
While Z flashing is intended to redirect water without sealing, in wetter climates, you may use a thin bead of exterior-grade sealant on top along the edge where the flashing intersects the sheathing. This serves as an extra wind-driven rain barrier.
5. Install the Upper Panel
Cut and trim your top T1-11 panel to fit over the flashing and position it down, so the bottom of the panel is just above the middle protruding section of the flashing, and the top leg of the flashing is at the back of the siding. This will direct water down over the flashing instead of behind it.
Secure your top panel according to manufacturer guidelines, usually against framing members or studs, making it flush and level.
6. Check Your Installation
Inspect your installation for:
- Gaps at flashing terminations
- Adequate overlapping of flashing sections
- Fastening that does not warp flashing
- Correct panel siding alignment
Giving yourself time here avoids small errors from becoming expensive repairs in the future.
Tips for Success
- Use high-quality flashing materials. Galvanised or aluminium flashing with corrosion resistance will be more durable in Australian climates.
- Don’t omit flashing joints. Small horizontal openings require flashing to preserve the integrity of the siding.
- Look after your siding. Check flashing once a year for debris accumulation, corrosion, or openings that require resealing.
- Comply with local building codes. Specifications can differ based on your state or council bylaws.
Why Z Flashing is Non-Negotiable for T1-11 Siding
Without Z flashing, water penetrating panel joints can lead to:
- Swelling of the edges of plywood
- Wood rot or mould development behind siding
- Structural damage to the framing
- Shortened lifespan of your entire cladding system
It’s an enormous return for so small an investment. As James Hardie details in its guide to flashing and weatherproofing, flashing is essential for avoiding damage from moisture penetration and achieving compliance with Australian building standards.
Conclusion
Installing Z flashing over T1-11 siding isn’t only good practice – it’s critical to achieving a watertight, code-compliant construction. Getting it right the first time saves you thousands of dollars in repairs and keeps your projects sharp-looking for years to come.
If you’re sourcing premium Z flashing and siding materials, Singh Roofing Supplies stocks high-quality galvanised and aluminium flashing options to suit all your cladding projects. Contact our team today for expert advice and reliable supplies to keep your builds watertight and durable.